Traverse Global v11.2
Assign Item Labels
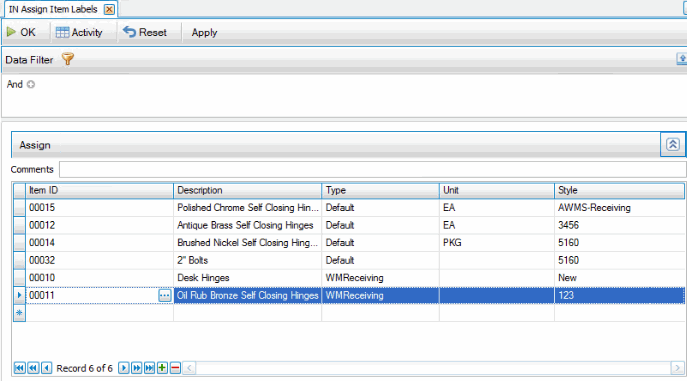
Use the Assign Item Labels function to assign label styles that you create to inventory items. You can create custom labels using the Item Labels function on the IN Master List menu, or the Receiving Labels function on the WM Master List menu. Alternately, you can create custom labels using a third-party label provider such as BarTender. Label styles might include general item labels, receiving labels, hazardous material labels, ingredient labels, etc.
The SM business rule to set the Label Provider determines your label style options. If the Label Provider business rule is set to 'Standard' (default), you can choose a label style you created in the label functions mentioned above. If the Label Provider business rule is set to a third-party label provider, you will have to enter the label style. For more details on how the system determines which label style and printer to use, see the Label Overview topic.
- Use the Data Filter to select the range of filtering options or leave the filter blank to include all available data.
- Click Apply to see all records in the item label table that match the criteria. The results will populate the data grid.

- Enter any comments in the Comments field.
- Select an Item ID to which you want to assign the label style. The read-only item Description fills in.
- Select the label Type you are assigning. Select 'WM Receiving' to assign a label style to print from the WM Receiving function or the WM Receiving Labels function. Select 'Default' for all other circumstances. This field is required.
- Select a Unit of measure to which you are assigning a label style. You can assign different label styles to different units of measure for an item. You can leave this field blank.
- Enter or select a Label Style to assign to the items. If you selected a label Type of 'WM Receiving', you can select from label styles you created using the WM Receiving Labels function. If you selected a label Type of 'Default', you can select from label styles you have created in Traverse using the Item Label function on the IN Master List menu. If you use a third-party label provider, enter a label designation for a label you created with a third-party label provider such as BarTender. You can leave this field blank.
- Click a command button to
| Click | To |
|---|---|
| OK | Save the assign label information to the item label table. |
| Activity | View the Activity Log for details. |
| Reset | Set all fields to their default values. |
| Apply | Apply the Data Filter to the item label table and populate the data grid with the results. |
Once a record is saved, you can only edit the Label Style field.
If you want to edit the label style of multiple items that have the same type and unit, use the Toggle button to show the Advanced Options section. This allows you to update the label style for a number of items at the same time.
This section will assign a different label style to any item in the grid that matches the label type and unit you choose in the Advanced Options section.

- Select a Label Type and Unit of measure for the items to which want to assign a different label style.
- Enter or select a Label Style to assign to the items. You can select from label styles you have created in Traverse using the Item Label function on the IN Master List menu, or you can enter a label designation for a label available from a third-party label provider such as BarTender. Note: This label style will replace any currently-assigned label style on items where the label type and unit match the label type and unit you selected in the Advanced Options section.
- Use the Assign button to assign the label style to the items in which the label type and unit match the Advanced Options section.
- The process is not complete until you use the OK button to save the assign label information.
To remove a label assignment, select the record in the grid, then use the Delete Record button ( ). Once you delete the record from the grid, click OK to complete the process.